Assigning a public IP address to your Raspberry Pi opens up a world of possibilities, from remote access to hosting services. If you're looking to connect your Raspberry Pi to the internet with a public IP, this article is your ultimate guide. We’ll walk you through every step, ensuring you achieve seamless connectivity and optimal performance.
Whether you're a tech enthusiast or a beginner exploring the capabilities of Raspberry Pi, assigning a public IP address is a crucial skill. It allows you to access your device remotely, set up web servers, or even configure IoT devices. This article will provide detailed instructions, helpful tips, and expert advice to help you achieve this goal.
As technology evolves, so does the importance of networking and connectivity. By the end of this guide, you'll not only understand how to assign a public IP to your Raspberry Pi but also grasp the underlying principles of networking and security. Let’s dive in!
Read also:Unveiling The Enigma The Journey Of Mr Stiven
Table of Contents
- Introduction to Public IPs and Raspberry Pi
- Understanding Raspberry Pi Basics
- Networking Fundamentals for Raspberry Pi
- What is a Public IP Address?
- Steps to Assign Public IP to Raspberry Pi
- Security Considerations
- Troubleshooting Common Issues
- Applications of Public IP with Raspberry Pi
- Further Reading and Resources
- Conclusion and Next Steps
Introduction to Public IPs and Raspberry Pi
Why Assign a Public IP?
A public IP address is essential for devices that need to communicate directly with the internet. When you assign a public IP to your Raspberry Pi, you enable it to act as a server, host applications, or allow remote access. This functionality is particularly useful for projects like home automation, web hosting, or running a media server.
By understanding the basics of public IPs and their integration with Raspberry Pi, you can enhance the functionality of your projects and take full advantage of the device's capabilities.
Understanding Raspberry Pi Basics
What is Raspberry Pi?
Raspberry Pi is a compact, affordable single-board computer designed for learning programming and exploring hardware projects. It supports various operating systems, including Linux-based distributions like Raspbian, and offers a wide range of connectivity options.
- Compact and versatile design
- Supports multiple operating systems
- Perfect for IoT and networking projects
Networking Fundamentals for Raspberry Pi
Basic Networking Concepts
Before diving into assigning a public IP, it's important to understand the basics of networking. Key concepts include:
- IP Addressing: Identifying devices on a network
- Subnetting: Dividing networks into smaller segments
- Router Configuration: Managing network traffic
These concepts form the foundation for successfully configuring your Raspberry Pi to use a public IP.
What is a Public IP Address?
Definition and Importance
A public IP address is a unique identifier assigned to a device that allows it to communicate over the internet. Unlike private IPs, which are used within local networks, public IPs are globally accessible and essential for internet-facing services.
Read also:Fake Undress Ai Free Understanding The Technology And Its Implications
Assigning a public IP to your Raspberry Pi enables it to:
- Host websites or applications
- Allow remote access
- Integrate with cloud services
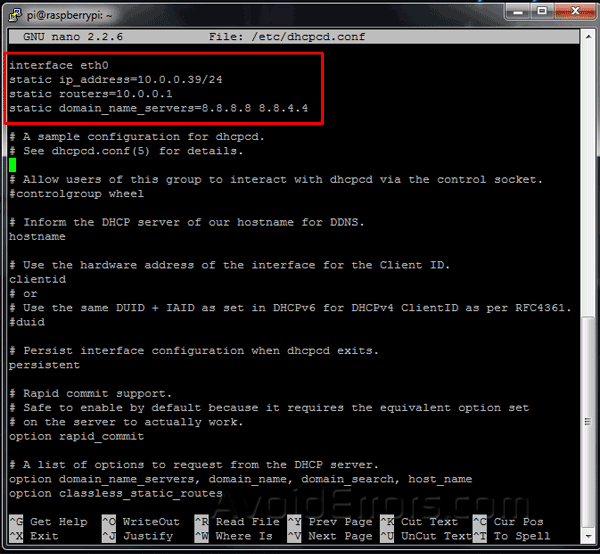
Steps to Assign Public IP to Raspberry Pi
Step 1: Connect Raspberry Pi to the Network
Ensure your Raspberry Pi is connected to your local network via Ethernet or Wi-Fi. This connection is necessary for accessing your router's configuration interface.
Step 2: Access Router Settings
Log in to your router's admin panel using its default gateway address (usually 192.168.1.1 or 192.168.0.1). Use the provided credentials or consult your router's manual for login details.
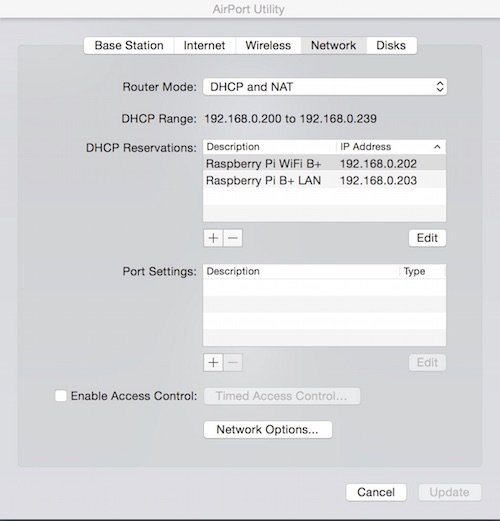
Step 3: Configure Port Forwarding
Set up port forwarding rules to direct incoming traffic to your Raspberry Pi. Common ports include:
- Port 22 for SSH
- Port 80 for HTTP
- Port 443 for HTTPS
Step 4: Obtain Public IP Address
Check your public IP by visiting websites like whatismyip.com. Ensure your Raspberry Pi is reachable from the internet using this address.
Step 5: Test Connectivity
Use tools like ping or ssh to verify that your Raspberry Pi can be accessed remotely. This step confirms successful configuration.
Security Considerations
Best Practices for Securing Your Raspberry Pi
Security is paramount when exposing your Raspberry Pi to the internet. Follow these best practices:
- Use strong, unique passwords
- Enable firewalls and intrusion detection systems
- Regularly update software and firmware
Troubleshooting Common Issues
Problem: Cannot Access Raspberry Pi Remotely
Ensure port forwarding is correctly configured and that your router's firewall allows incoming traffic. Double-check your public IP address for accuracy.
Problem: Slow Connection Speeds
Optimize your network settings and consider upgrading your internet plan if necessary. Monitor bandwidth usage to identify bottlenecks.
Applications of Public IP with Raspberry Pi
Web Hosting
Use your Raspberry Pi as a web server by installing software like Apache or Nginx. This setup is ideal for hosting personal websites or testing environments.
Remote Access
Enable SSH or VNC to access your Raspberry Pi remotely. This feature is invaluable for managing projects or troubleshooting issues from anywhere.
Further Reading and Resources
Recommended Reading
For deeper insights into networking and Raspberry Pi projects, consider the following resources:
Conclusion and Next Steps
Assigning a public IP to your Raspberry Pi is a powerful step toward unlocking its full potential. By following the steps outlined in this guide, you can successfully configure your device for remote access and hosting services. Remember to prioritize security and regularly update your setup to maintain optimal performance.
Take action today by trying out the steps discussed. Share your experience in the comments below or explore other articles on our site for more Raspberry Pi tips and tricks. Happy tinkering!