Setting up IoT device SSH for free is a crucial step in managing remote devices securely and efficiently. Whether you're a hobbyist, developer, or professional, understanding how to configure SSH for your IoT devices can significantly enhance your project's functionality and security. This guide will walk you through the entire process, ensuring you have all the knowledge you need to get started.
IoT devices are revolutionizing the way we interact with technology, but their management requires specialized tools and protocols. Secure Shell (SSH) is one such protocol that provides a secure and encrypted way to access and manage these devices remotely. By following this guide, you'll learn how to set up SSH on your IoT device without spending a dime.
As cybersecurity becomes increasingly important, setting up SSH for IoT devices is no longer optional—it's essential. This article will cover everything from the basics of SSH to advanced configurations, ensuring your IoT devices remain secure and functional. Let's dive in!
Read also:Illegal Ufc Live Stream The Risks Consequences And Alternatives
Table of Contents
- Introduction to SSH
- Why Use SSH for IoT Devices?
- Choosing the Right IoT Device
- Installing an SSH Server
- Securing Your SSH Setup
- Testing the SSH Connection
- Troubleshooting Common Issues
- Advanced SSH Configurations
- Free Alternatives for SSH
- Conclusion and Next Steps
Introduction to SSH
Secure Shell (SSH) is a cryptographic network protocol that facilitates secure communication between devices over an unsecured network. Initially developed in 1995, SSH has become a cornerstone for remote access and administration in the tech world. For IoT devices, SSH offers a reliable way to manage and interact with devices from anywhere in the world.
SSH operates on port 22 by default and uses encryption to protect data during transmission. This ensures that sensitive information, such as login credentials, remains secure even when transmitted over public networks. By setting up SSH for your IoT device, you gain the ability to execute commands, transfer files, and monitor system performance remotely.
Some key benefits of using SSH for IoT devices include:
- Encrypted communication for enhanced security.
- Easy remote access without the need for physical presence.
- Compatibility with a wide range of devices and operating systems.
Why Use SSH for IoT Devices?
IoT devices often operate in environments where physical access is limited or impractical. In such cases, remote management becomes essential. SSH provides a secure and efficient solution for managing IoT devices remotely. Below are some reasons why SSH is ideal for IoT applications:
Security
SSH employs strong encryption algorithms, such as AES and RSA, to protect data during transmission. This makes it highly secure compared to other protocols like Telnet, which transmit data in plain text.
Flexibility
SSH supports a wide range of functionalities, including command execution, file transfer, and tunneling. This flexibility allows you to perform various tasks on your IoT device without needing additional tools.
Read also:What Ethnicity Is Cleo Sol Unveiling Her Multifaceted Background
Cost-Effectiveness
Many IoT devices come with built-in support for SSH, eliminating the need for additional software or hardware. Additionally, there are numerous free SSH clients and servers available, making it an affordable solution for managing IoT devices.
Choosing the Right IoT Device
Before setting up SSH, it's important to choose the right IoT device for your project. The device you select should meet your specific requirements in terms of processing power, memory, and connectivity. Some popular IoT devices for SSH setup include:
- Raspberry Pi
- Arduino
- ESP8266/ESP32
- BeagleBone
Each of these devices has its own strengths and weaknesses, so it's essential to evaluate your needs before making a decision. For example, if you require a device with high processing power and extensive connectivity options, the Raspberry Pi might be the best choice. On the other hand, if you're looking for a lightweight and cost-effective solution, the ESP8266 could be more suitable.
Installing an SSH Server
Once you've chosen your IoT device, the next step is to install an SSH server. The process varies depending on the operating system and hardware you're using. Below is a general guide for installing SSH on common IoT platforms:
Raspberry Pi
For Raspberry Pi devices running Raspbian OS, SSH is enabled by default. However, if it's disabled, you can enable it by running the following command in the terminal:
sudo systemctl enable ssh
sudo systemctl start ssh
ESP8266/ESP32
On ESP8266/ESP32 devices, you'll need to install a lightweight SSH server such as Dropbear. This can be done using the Arduino IDE or PlatformIO by including the necessary libraries in your project.
Arduino
While Arduino devices typically lack the processing power to run a full-fledged SSH server, you can use a serial-to-SSH bridge to achieve similar functionality. This involves connecting your Arduino to a computer or another device that runs an SSH server.
Securing Your SSH Setup
Security is paramount when setting up SSH for IoT devices. Here are some best practices to ensure your setup remains secure:
Change Default Port
Changing the default SSH port from 22 to a non-standard port can help deter automated attacks. To do this, edit the SSH configuration file:
sudo nano /etc/ssh/sshd_config
Find the line that says "Port 22" and change it to your desired port number. Don't forget to restart the SSH service after making changes:
sudo systemctl restart ssh
Disable Root Login
Disabling root login prevents attackers from gaining administrative access to your device. To disable root login, edit the SSH configuration file and set the "PermitRootLogin" option to "no".
Use Key-Based Authentication
Key-based authentication is more secure than password-based authentication. To set it up, generate an SSH key pair on your local machine:
ssh-keygen -t rsa -b 4096
Copy the public key to your IoT device:
ssh-copy-id user@iot_device_ip
Testing the SSH Connection
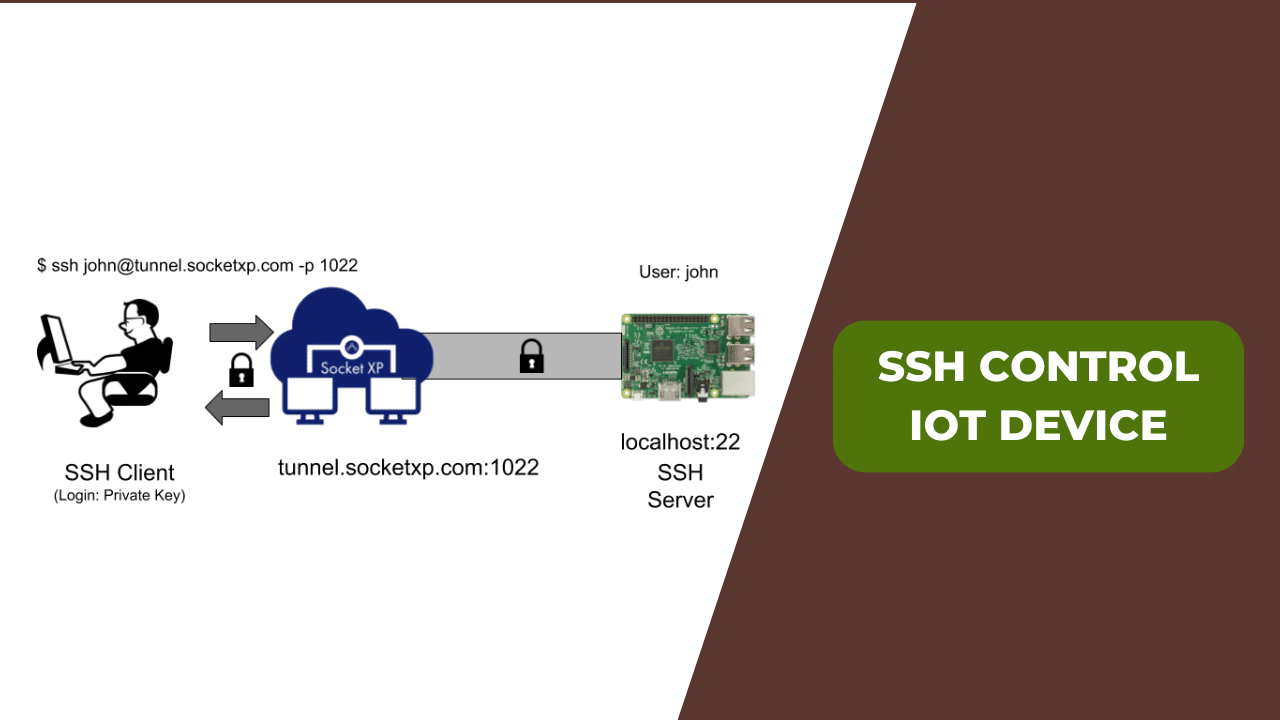
Once your SSH server is installed and configured, it's time to test the connection. Open a terminal or SSH client on your local machine and enter the following command:
ssh user@iot_device_ip
If everything is set up correctly, you should be able to log in to your IoT device without any issues. If you encounter problems, refer to the troubleshooting section below.
Troubleshooting Common Issues
Setting up SSH for IoT devices can sometimes be challenging. Below are some common issues and their solutions:
Connection Refused
This error usually occurs when the SSH server is not running or the port is blocked. Check that the SSH service is running and ensure there are no firewall rules blocking the port.
Permission Denied
If you receive a "permission denied" error, it may be due to incorrect file permissions or misconfigured authentication settings. Verify that your SSH key is correctly installed and that the file permissions are set appropriately.
Timeout Error
A timeout error often indicates network connectivity issues. Ensure that your IoT device is connected to the same network as your local machine and that there are no network configuration problems.
Advanced SSH Configurations
For users who want to take their SSH setup to the next level, there are several advanced configurations to consider:
SSH Tunneling
SSH tunneling allows you to securely access services running on your IoT device from a remote location. This can be particularly useful for accessing databases or web servers hosted on the device.
SSH Port Forwarding
Port forwarding enables you to forward traffic from one port on your local machine to another port on your IoT device. This is useful for applications that require specific port numbers.
SSH Key Rotation
Regularly rotating SSH keys ensures that compromised keys do not pose a security risk. Automate this process using scripts or tools to simplify key management.
Free Alternatives for SSH
While SSH is the most widely used protocol for remote access, there are other free alternatives worth considering:
OpenVPN
OpenVPN provides secure and encrypted communication between devices over a virtual private network (VPN). It's particularly useful for managing multiple IoT devices simultaneously.
mosh (Mobile Shell)
Mosh is a mobile-friendly alternative to SSH that supports intermittent connectivity and automatic session resumption. This makes it ideal for IoT devices with unstable network connections.
Web-Based SSH Clients
For users who prefer a web-based interface, there are several free SSH clients available, such as AjaxTerm and WebShell. These clients allow you to access your IoT device from any device with a web browser.
Conclusion and Next Steps
Setting up SSH for IoT devices is a straightforward process that can significantly enhance the security and functionality of your projects. By following the steps outlined in this guide, you can configure SSH on your IoT device for free and enjoy the benefits of secure remote access.
Remember to prioritize security by implementing best practices such as changing default ports, disabling root login, and using key-based authentication. Additionally, explore advanced configurations and free alternatives to further enhance your SSH setup.
We encourage you to share your thoughts and experiences in the comments section below. If you found this article helpful, consider sharing it with others who may benefit from it. For more in-depth guides and tutorials, explore our other articles on IoT and cybersecurity.